Overview
TeamTrace lets administrators control which employee information users can access by configuring Roles and Permissions. You can create roles for different responsibilities and choose which areas of TeamTrace each role can access. This protects employee information and makes sure users only see the data they need for their work.
For example, a manager may need to view information about their team, while an employee may only need access to their own profile and work information.
Primary location: Settings > Roles
Reference: TeamTrace Roles and Permissions Documentation
1. How Access Control Works
TeamTrace uses role-based access control. Administrators create roles and configure permissions for each one. Permissions cover people, projects, tasks, screenshots, reports, resources, settings and other modules.
- Role: defines the type of access assigned to a user.
- Permission: determines which information or functionality is available to users with that role.
- Data visibility: determines whose information a person can view, based on the permissions configured.
The aim is to give access according to job responsibilities rather than unrestricted visibility to every user.
2. Open Role Management
- Log in to the TeamTrace portal with an account that has the required administrative permissions.
- Open Settings from the navigation bar.
- Select Roles. The role management screen opens.
From here you can manage existing roles or create a new role.
3. Create a Role with Specific Permissions
If different users need different levels of access, create separate roles for their responsibilities.
- Open Settings > Roles.
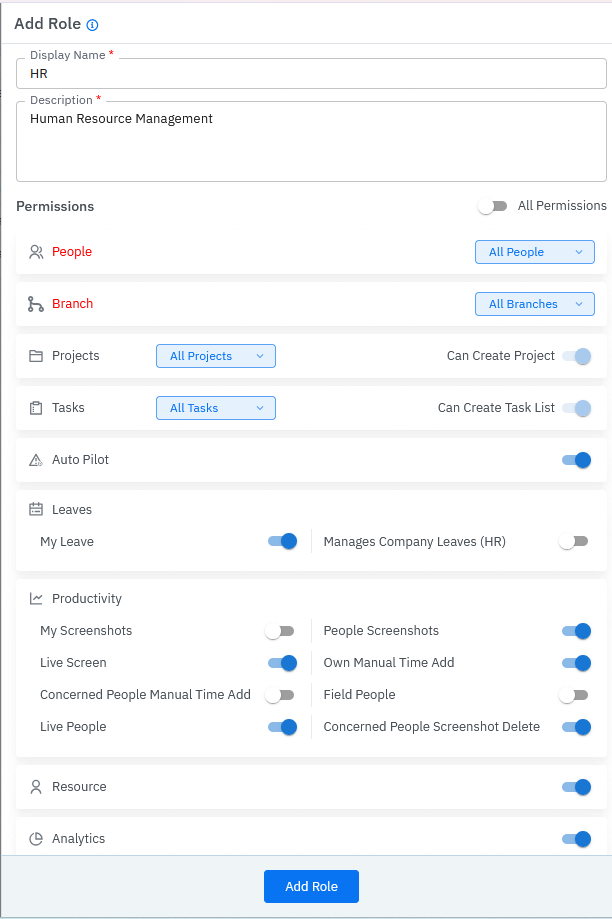
- Click Add to create a new role.
- Enter the role name.
- Add a description explaining the purpose of the role.
- Review the available permission options.
- Select only the permissions the role needs.
- Click Submit to save.
You can select the top-level checkbox to grant all displayed permissions, or select individual checkboxes to customize access.
Important: Avoid selecting all permissions unless the user genuinely needs broad access.
4. Control Which Employees a User Can View
The All People permission controls whether users in the role can view all members of the organization or only their own profile.
- All People enabled: the role can view all members of the organization.
- All People disabled: the role can view only its own profile.
Recommended use:
- For a role that should only see the user's own profile, keep All People disabled.
- For an authorized HR or administrative role that needs organization-wide visibility, enable it only when necessary.
Note: The exact information visible within a profile may also depend on other permissions.
5. Restrict Access to Projects and Tasks
The All Projects and All Tasks permissions control whether users can access organization-wide project and task information or only their own.
- Projects: the options are All Projects and Own Projects.
- Tasks: the options are All Tasks and Own Tasks.
Recommended use: For users who should only work with their own projects and tasks, choose the more restricted options. For project managers who need broader visibility, assign the extra access only when required.
Reference: TeamTrace User Setup Documentation
6. Control Access to Screenshots and Employee Activity
Activity information and screenshots can contain sensitive work-related data. TeamTrace provides permissions and settings to manage who can access them.
Auto Pilot
Allows users with the role to view screenshots of other users assigned under them. Grant it only when the user needs that visibility for their responsibilities.
Concerned People Screenshot Delete
Allows authorized users to delete screenshots of their assigned team members. Review this permission carefully. Deleting a screenshot also excludes the corresponding time from total working hours.
Screenshot Policy
| Policy | What it does |
| No Screenshot | Disables automatic screenshot capture during work sessions. |
| Blur Screenshot | Captures screenshots with the content blurred. |
| Normal Screenshot | Captures standard screenshots. |
| Normal + Head shot | Captures the active screen and a webcam snapshot at the same time. |
Screenshot policies control collection, while role permissions control who can access the information. These are separate considerations.
Reference: TeamTrace Settings Documentation
7. Review Other Employee-Data Permissions
| Permission | Purpose |
| All People | Controls visibility of organization members versus the user's own profile. |
| All Projects | Controls the scope of project visibility. |
| All Tasks | Controls the scope of task visibility. |
| Auto Pilot | Allows viewing screenshots of users assigned under the role holder. |
| Concerned People Manual Time Add | Allows authorized users to add working hours on behalf of assigned team members. |
| Field People | Relates to employees assigned to fieldwork or external tasks. |
| Live People | Provides access to users who are currently active and logged in. |
| Concerned People Screenshot Delete | Allows deletion of screenshots of assigned team members. |
| Resource | Provides resource, workload, availability and task-allocation information. |
| Analytics | Provides access to analytics and performance metrics. |
| Billing | Provides access to billing-related information. |
| Settings | Allows access to configuration and organizational settings. |
Check the exact effect of each permission in the current role configuration screen, especially where a permission name doesn't fully describe its scope.
8. Assign the Right Role to Each User
Creating a role defines its permissions. You must also make sure each user has the appropriate role.
- Identify the user's responsibilities.
- Decide which employee information the user needs to access.
- Select a role with the required permissions.
- Avoid granting extra access for convenience.
- Review the user's access after the role is assigned.
For example, a client who needs visibility into one project is better served by project-level access than by broad organization-wide employee visibility.
9. Review Monitoring and Data-Collection Settings
Controlling who can view employee data is different from controlling what data is collected. Depending on your configuration, Settings > Productivity and Settings > Security include:
- Screenshot frequency and policies
- Application tracking
- Idle timeout
- Manual time entry
- Website blocking
- USB blocking
- Silent tracking
- Tracker restrictions
Use these settings to configure how features collect and operate. They are not a substitute for role-based access permissions.
10. Best Practices for Protecting Employee Data
- Apply least-privilege access: give each user only the permissions needed for their work.
- Restrict organization-wide visibility: enable All People only for roles that require it.
- Limit monitoring-data access: grant screenshot and activity permissions only to authorized personnel.
- Separate responsibilities: use different roles for employees, managers, HR and administrators when their access needs differ.
- Review permissions regularly: reassess access when employees change roles or responsibilities.
- Remove unnecessary access: update permissions when a user no longer needs them.
- Document the purpose of each role: use the role description to explain why the access was granted.
- Communicate monitoring practices: tell employees what is collected, why, how long it is retained and who can access it, in line with applicable requirements.
TeamTrace's Privacy Policy states that the customer organization decides which workforce-monitoring features to enable, what data to collect and who may access it. It also requires appropriate employee notice and consent where applicable.
11. Troubleshooting
| Issue | What to check |
| A user can view all employees' information | Check whether All People is enabled for the user's role. |
| A user can access projects they don't need | Review the role's All Projects permission and project access. |
| A user can access tasks outside their responsibilities | Review the role's All Tasks permission and task access. |
| A user can view other employees' screenshots | Review Auto Pilot and other relevant permissions. |
| A user can modify or delete monitoring records | Review the screenshot and manual-time permissions granted to their role. |
| A user can't access a required feature | Confirm the right permission is enabled and the user has the correct role. |
| Different users see different information | Compare their roles and permissions. The difference may be intentional. |
12. Frequently Asked Questions
Can I restrict an employee to viewing only their own profile?
Yes. Disabling All People restricts the role to viewing its own profile.
Can I create separate roles for different departments?
Yes. You can create roles with customized permissions for department-specific needs.
Should every manager have access to all employees?
Not necessarily. Grant organization-wide visibility only when the manager's responsibilities require it.
Does disabling screenshot capture prevent users from viewing existing screenshots?
Not necessarily. The screenshot policy controls whether screenshots are captured. It doesn't state that changing the policy removes access to screenshots already captured. Review the relevant role permissions separately.
Does disabling a permission automatically remove previously collected employee data?
Don't assume so. Permissions govern access, while retention and deletion are separate matters. Follow your organization's data-retention process and verify the feature's behavior before making changes.
Summary
To control access to employee data in TeamTrace, start with Settings > Roles. Create or update roles, configure the relevant permissions, and give users only the access they need. Pay particular attention to All People, All Projects, All Tasks, Auto Pilot, screenshot permissions and Analytics. Review monitoring settings separately, and check regularly that access to employee data is still appropriate.
Related Articles
Was this article helpful?
That’s Great!
Thank you for your feedback
Sorry! We couldn't be helpful
Thank you for your feedback
Feedback sent
We appreciate your effort and will try to fix the article