Overview
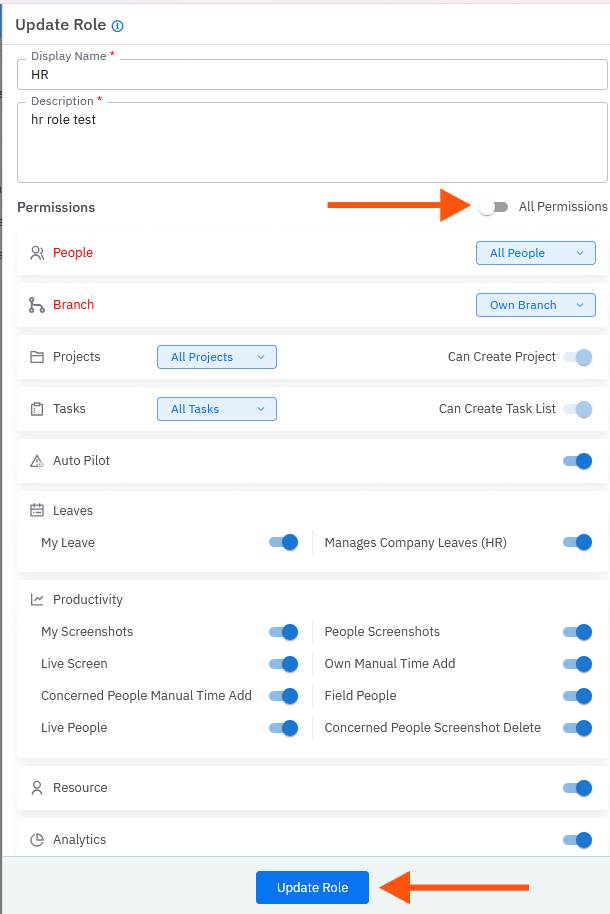
Roles control what each user can see and do in TeamTrace. When you create a role, you turn on the permissions (toggles) that users in that role need, choose a dashboard view, and save the role. This article explains what each permission does and how to manage roles after they are created.
Permission Matrix
Autopilot
| Permission | What it allows |
| Autopilot | Gives the role access to custom alert lists for various scenarios, along with the associated logs. |
Leave
| Permission | What it allows |
| My Leave | Users in this role can view their own leave records. |
| Company Leave | Users in this role can view leave records for all employees across the organization. |
Productivity
| Permission | What it allows |
| My Screenshots | Users see their own activity data and screenshots. |
| People Screenshots | Users see activity data and screenshots for all users across the organization. |
| Live Screen | Users can view their own live screen feed. |
| Own Manual Time Add | Users can manually log their own time when there is a discrepancy. |
| Concerned People Manual Time Add | Users can manually add time on behalf of other users when a discrepancy arises. |
| Field People | Shows the availability of field personnel who are managed through a separate platform. |
| Live People | Shows whether other users are logged in for the day and what they are currently working on. This shows availability only. It does not show other users' screenshots. |
| Concerned People Screenshot Delete | Users can delete screenshots that belong to other users. Deleting a screenshot also removes the associated time from that user's timesheet. |
Tabs and Sections
| Permission | What it allows |
| Resource | Gives access to the Resource tab, which includes Skill Search, People Movement and Staff Compare. |
| Analytics | Gives access to the Analytics tab, which includes multiple report types. |
| Billing | Gives access to the Billing tab. |
| Settings | Gives access to the Settings tab. |
Dashboard
Use the Dashboard drop-down to assign the dashboard view for users in this role. Each option offers a different user interface designed for different workflows.
How to Save a New Role
- Turn on the permissions the role needs.
- Select the appropriate dashboard from the Dashboard drop-down.
- Click Add Role to save the role to your organization.
Manage Existing Roles
After a role is created, you can at any time:
- Update the role.
- Duplicate the role.
- Delete the role.
- Filter by role name to find a specific role.
Assign the Role to a User
When you create a new user in your organization, the newly created role is available to select for that user.
Notes
- Deleting another user's screenshot also removes the linked time from their timesheet, so grant Concerned People Screenshot Delete carefully.
- Live People shows availability only, not screenshots.
Troubleshooting
| Problem | What to check |
| A user can't see a tab such as Resource, Analytics, Billing or Settings | Check that the matching toggle is enabled on the user's role. |
| A user can see only their own screenshots | Check whether People Screenshots is enabled for the role. My Screenshots shows only the user's own data. |
| The new role isn't available when creating a user | Confirm the role was saved by clicking Add Role. |
Related Articles
Was this article helpful?
That’s Great!
Thank you for your feedback
Sorry! We couldn't be helpful
Thank you for your feedback
Feedback sent
We appreciate your effort and will try to fix the article