Overview
The Tasks section in TeamTrace lets you organize work into task lists, create and assign tasks, and track progress in list, board and calendar views. This article walks through creating a task list, adding tasks, the task views, filters, statuses, priorities, custom fields and task list settings.
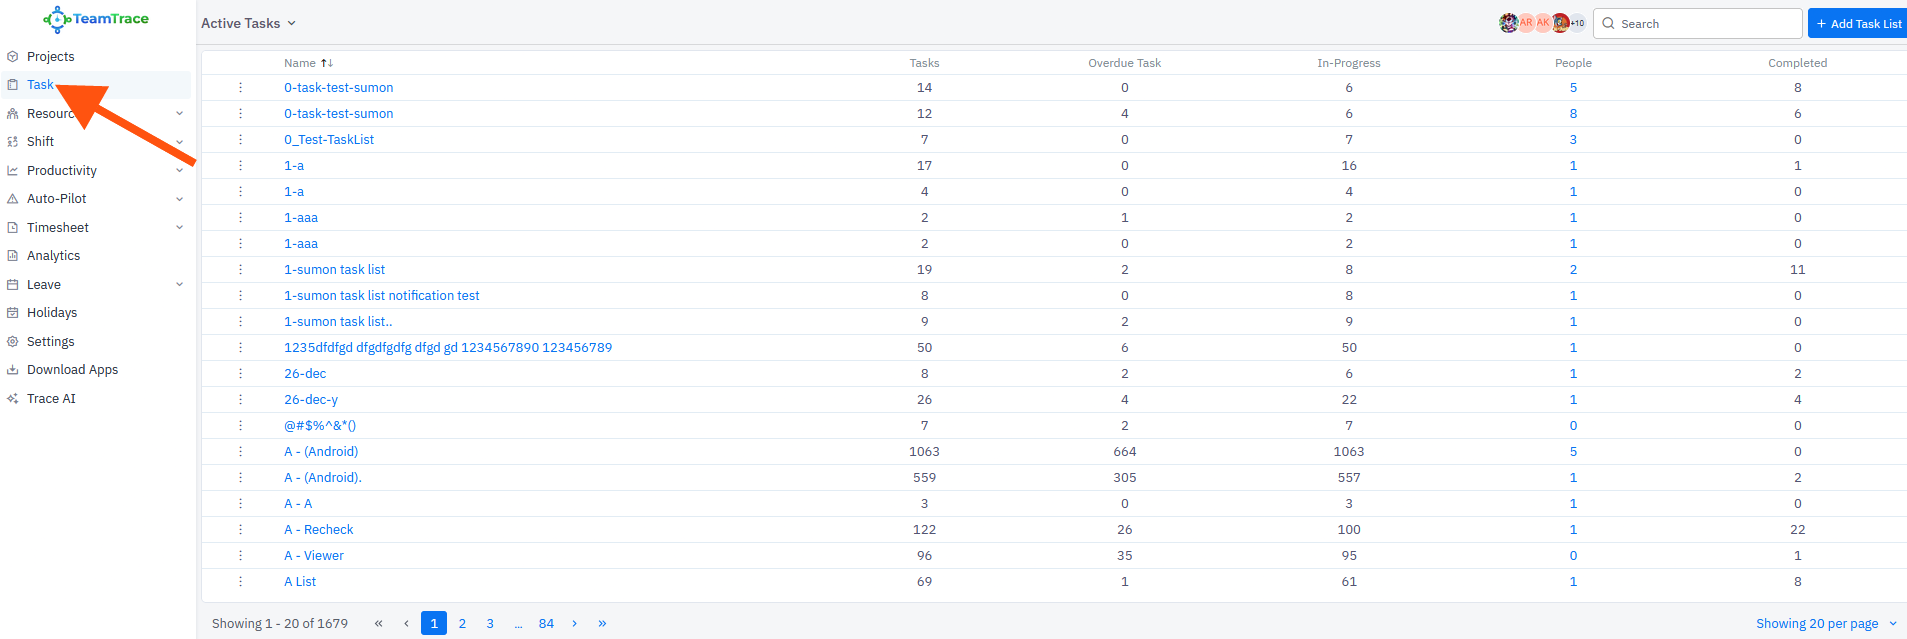
[Add: how to open the Tasks section (menu path).]
1. Create a Task List
You must create a task list before you can add any tasks.
- Click Add Task List in the top right corner of the screen. A form opens.
- Enter a name for the task list.
- Select the people to assign to the task list and choose their access roles.
- Click Add to include them. A drop-down then appears where you can fine-tune the access role for each user you added.
- Click Save to create the task list.
2. Task List Dashboard
Click a task list to open it. A new task list has no data, so its dashboard is blank at first. Once tasks are added, the dashboard shows:
| Metric | What it shows |
| Task distribution by status | A pie chart showing how tasks are spread across your statuses. |
| Overdue tasks | Tasks that have passed their deadline. A drop-down lets you switch between Overdue and Due Today. |
| Workload | A bar chart of how tasks are distributed among members, so you can spot anyone who is overloaded or underused. |
| Upcoming deadlines | Tasks that are due in the near future. |
| Progress status | A stacked bar chart with a per-person breakdown of task progress. |
3. Add a Task
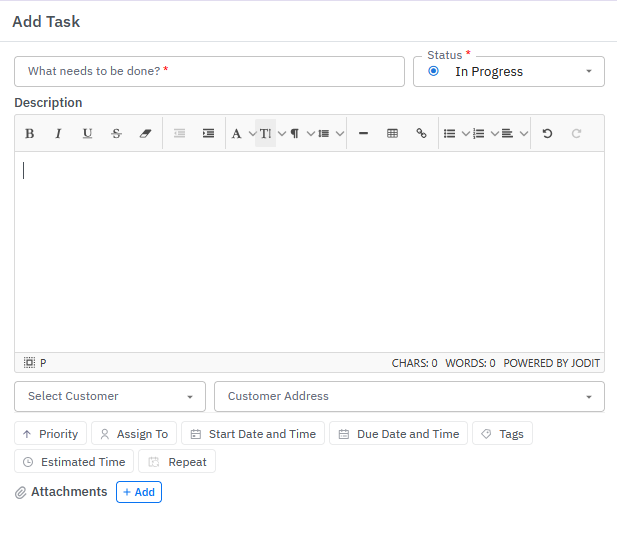
- Click the Add Task icon. A form opens.
- Fill in the details you need (see the table below).
- Save the task.
| Field | Notes |
| Task name | Mandatory |
| Status | Mandatory |
| Description | Optional |
| Customer and address | Optional. If you select a customer, the customer address becomes mandatory. You can also click the maps icon to drag and select a custom location on the map. |
| Priority | Optional |
| Assignees | Optional. Pick from the members already added to the task list. |
| Start and end date and time | Optional |
| Tags | Optional |
| Estimated time | Optional |
| Repeat interval | Optional. Use it for recurring tasks. |
| Attachments | Optional |
Apart from the task name and status, fill in only what is relevant to your workflow.
4. List View and the Task Side Panel
After you save a task, open the list view to see it in the list. Click the task to open a side panel on the right with all the task details. The panel has these tabs:
| Tab | What it does |
| Comments | Team members can comment on the task. You can tag any user in the task list, and TeamTrace automatically emails them as a reminder. |
| History | A full log of every update and action on the task: who did what and when. Useful for accountability and auditing changes. |
| Work Log | Work logs for any given month, broken down by each user who worked on the task. |
| Screenshots | Screenshots captured for users working on the task. Only company admins or managers with the required permission can see this tab. |
| Subtasks | Lists the child tasks of the main task. You can add a new subtask from here. |
5. Task Actions
Click the three-dot menu on any task or subtask to see these options:
- Edit: update the task details.
- Delete: remove the task.
- Clone: duplicate the task quickly.
- Move to: move a subtask to another parent task, or move the task to a different task list.
Important: Only the user who originally created a task can move it. Other members can't, even if they have access to the task.
6. Board View
The board view shows tasks as cards organized by status, giving you a Kanban-style overview of work in progress.
- You get the same Edit, Delete, Clone and Move options as in the list view.
- Click a task card to open its details. From the top right corner of the detail panel you can change the task's status.
- You can also drag and drop cards between status columns to update the status without opening the task.
7. Calendar View
The calendar view displays tasks on their due dates, so you can see what is coming up. For example, a task due on a given date appears on that date in the calendar.
8. Filters, My View and Search
Filters
Filter tasks by status, assignee, priority, date range and more. The view updates to show only matching tasks. Filters are available in the calendar and board views.
My View
With My View you can apply a filter and save it as a named view, so you don't have to set the filter again next time. This is useful for managers and admins who want quick customized views. Each team member can create and save their own views independently.
Search
Use Search Task to find any task in the task list by name.
9. Statuses
Statuses are fully customizable, so you can create statuses that match your team's workflow.
- Assign a status to a role: only users with that role in your organization can apply that status to a task. This gives you fine-grained control over how work moves through your pipeline.
- Final toggle: when it is enabled for a status, tasks moved to that status automatically shift to the end of the board in the board view, keeping active tasks front and center.
10. Priorities
Priorities are also fully customizable. Set up as many priority levels as your team needs and configure them the way you want.
11. Custom Fields
Custom fields let you add extra fields to your tasks that are specific to your organization's needs. When you create one, you configure:
| Setting | What it does |
| Field name | A name that makes the field easy to identify within the task. |
| Field type | The type of input the field accepts. TeamTrace offers a wide range of types. |
| Global | When on, the field appears across all tasks in all task lists in your TeamTrace profile. |
| Required | When on, the field is mandatory when creating or editing a task. |
| Visible | When on, the field is visible inside all tasks across your task lists. |
12. Task List Settings and Options
| Option | What it does |
| Settings | Set a default priority for tasks in the task list. Choose the one that fits your team's baseline expectations. |
| Notifications | Turn notifications on or off across four channels: web, mobile, email and WhatsApp. |
| Manage People | Add more members to the task list at any time, and assign or update their roles. |
| Import Task | Bulk import tasks into the task list from a CSV sheet. Useful when migrating from another tool or setting up a large project quickly. |
Notes
- A new task list shows a blank dashboard until tasks are added.
- Only the task name and status are mandatory when adding a task. Selecting a customer also makes the customer address mandatory.
- Only the user who created a task can move it to another parent task or task list.
- The Screenshots tab is visible only to company admins or managers with the required permission.
Troubleshooting
| Problem | What to check |
| I can't add a task | Make sure a task list exists, and that the task name and status are filled in. |
| The task can't be saved after selecting a customer | The customer address is mandatory once a customer is selected. |
| I can't move a task | Only the user who created the task can move it. |
| I can't apply a status to a task | The status may be assigned to a specific role. Check that you have that role. |
| The Screenshots tab isn't visible | It is available only to company admins or managers with the required permission. |
| A tagged person didn't get a notification | Check that they are part of the task list and that email notifications are turned on. |
Related Articles
Was this article helpful?
That’s Great!
Thank you for your feedback
Sorry! We couldn't be helpful
Thank you for your feedback
Feedback sent
We appreciate your effort and will try to fix the article