Overview
TeamTrace is a fully featured project management platform. You manage tasks and workflows under Projects, and for IT projects you can use the Scrum and Kanban frameworks. This article explains how to create a project, add team members and assign their access roles, and what you can do once the project exists.
Before You Begin
- Sign in to the TeamTrace portal with credentials that have permission to create projects.
- Add the people who will work on the project to TeamTrace first, so you can assign them during setup.
- Decide which project management tool and workflow (Kanban or Scrum) the project will use.
Steps to Create a Project
Step 1: Open the Projects page
- Sign in to the TeamTrace portal.
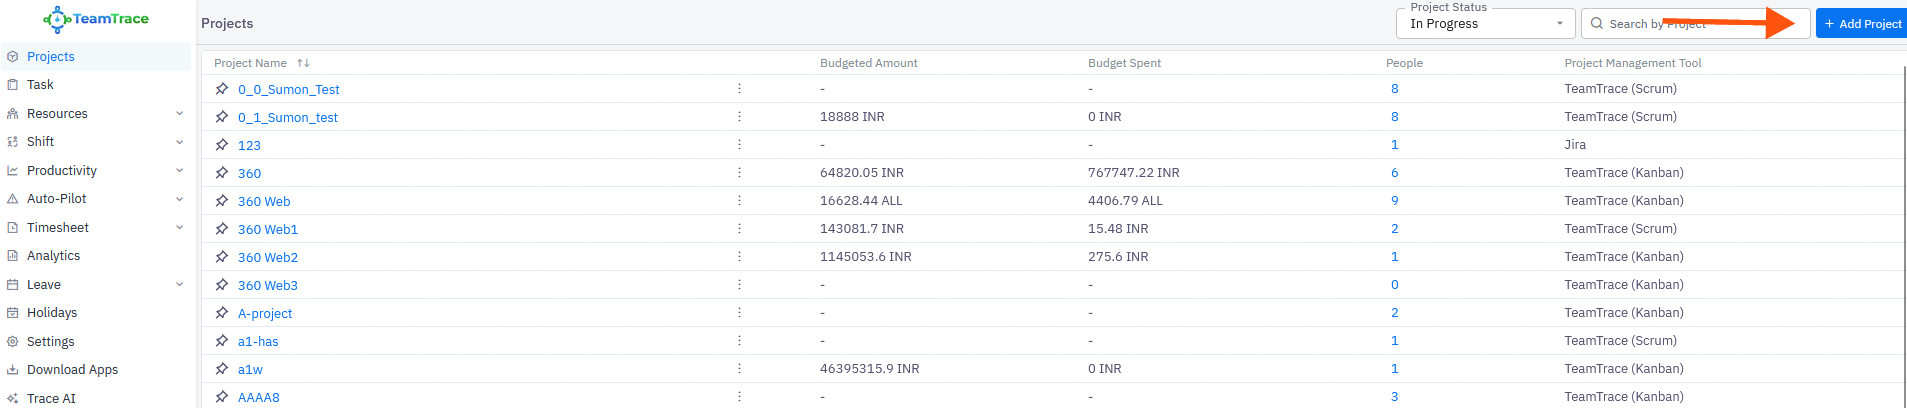
- Open the Projects menu and select Projects to open the projects dashboard. You will see the list of existing projects.
- Click + Add (also shown as Add Project) at the top right of the page. The project creation form opens.
Step 2: Fill in the project information
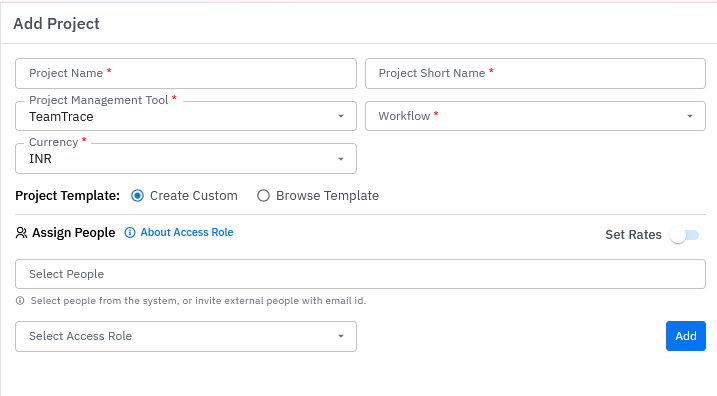
- Enter all mandatory fields, such as the project name, project management tool, workflow and deadlines.
- Select the Project Management Tool used to manage the project lifecycle: TeamTrace (recommended), Jira or ClickUp.
- Define the workflow, which is the working methodology for the project, such as Kanban or Scrum.
- Choose whether to create a custom project structure or use a predefined template.
Step 3: Add team members and assign access roles
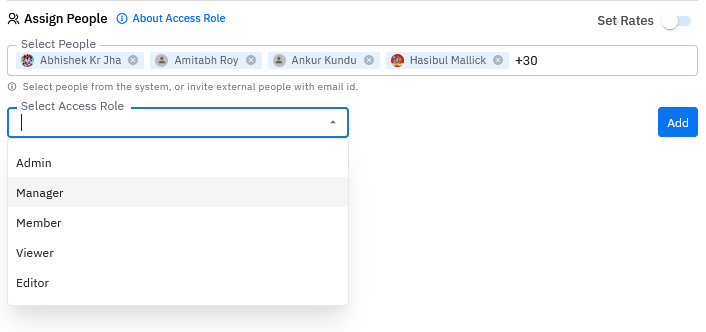
- Select the people for the project.
- Select the access role for them.
- Click Add.
- To add more people with different roles, repeat the steps. You can add multiple people for multiple roles.
To see how each access role is defined, click About Access Role. A pop-up opens on the left side of the screen.
Step 4: Save the project
- When all fields are complete, click Save and Next to continue.
- Click Add Project to finish.
Once created, the project appears in the list of projects.
Project List
The project list shows these columns:
| Column | What it shows |
| Project Name | The name given to the project |
| Cost Type | Fixed Cost, Monthly Retainer, or Time and Material |
| Budget | The budget assigned to the project |
| People | The number of people in the project |
| Project Management Tool | Kanban or Scrum |
Project Status Categories
Projects are grouped by status for easier tracking:
| Status | Description |
| In-Progress | Projects that are active and currently being worked on |
| Upcoming | Confirmed projects whose execution phase has not yet begun |
| Under-Discussion | Projects whose requirements or objectives are still being refined |
| Completed | Projects that have been successfully delivered |
| Closed / Canceled | Projects that were abandoned or left incomplete for particular reasons |
Update or Delete a Project
- In the project list, click the ellipsis (three dots) next to the project.
- Select Update to edit the project details, add or remove people, and edit access roles. Select Delete to remove the project.
What You Can Do After Creating a Project
Click the project name to open the Project Dashboard. From the project you can use these areas:
| Area | What it does |
| Dashboard | Shows people in the project, hours logged, the current sprint, overdue tasks, upcoming deadlines, workload and average handle time. |
| Board | Shows tasks under To Do, In Progress and Completed. You can drag tasks between columns. You can create custom fields under Settings > Custom Fields inside the project. |
| Backlog | Holds the prioritized list of work not yet started and the list of sprints. You can create a sprint from the top right of the page. |
| Epic | Holds large bodies of work broken into smaller tasks and sprints. Create one with the + Epic button. |
| Timeline | Shows Epic and Sprint timelines in Today, Week, Months and Quarter views. |
| Docs | Stores, manages and shares project documentation. |
| Files | Stores important project data. |
| Settings | Configures project settings. |
| Reports | Provides reports and matrices for the project. |
Notes
- All mandatory fields must be filled in before you can save the project.
- You can change people and access roles later using Update in the project list.
- Project templates let you reuse a predefined structure instead of building one from scratch.
Troubleshooting
| Problem | What to check |
| The Add button or Projects menu isn't visible | Check with your administrator that your account has permission to create projects. |
| The project can't be saved | Check that all mandatory fields are filled in. |
| A person isn't available to add to the project | Check that the person has been added to TeamTrace. |
| A new project isn't in the list | Confirm you clicked Add Project at the end, then check the status grouping. |
Related Articles
Was this article helpful?
That’s Great!
Thank you for your feedback
Sorry! We couldn't be helpful
Thank you for your feedback
Feedback sent
We appreciate your effort and will try to fix the article